Articles to help you use Flyerlink's Project management tool.
This feature helps you manage complex projects such as website builds. Project is especially useful if you have multiple people working on a project to give clarity over who is doing what and to mark off work when done.
It's a way to record work done and important information you may want to refer back to, such as login details and can store excel sheets of old data
The project tool in Flyerlink helps you keep track of all the tasks you need to do.
A project is usually a complex goal or aim with mutiple different types of tasks. A project can be both internal, such as a marketing campaign involving more than one person, or external, such as setting up a new website for a customer.
The tool is a great way of keeping track of what has and hasn't been done yet, due to the splitting of complex projects into simplier tasks.
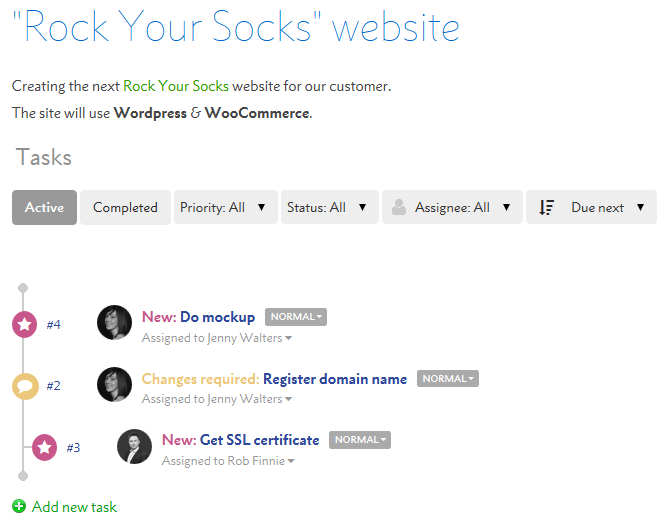
Each project has 1 or more tasks associated with it.
The task is one aspect of the project that needs to be completed by someone.
Each task has a status, priority and assignee.
A status is used to indicate how far a task has progressed.

Depending on the nature of the task, some statuses will definitely need to be used and others won't.
An example of a task to put a tweak to a website using both a development and live environment would be:
->->->->->->->.
However a simplier task that is requested, completed and then closed could just use:
-> -> , or -> -> .
If a task has the status or , it will no longer show as an Active task. Don't worry, you can still search for Closed tasks to refind what's been done.
The priority indicates how important this particular task is.

An immediate task should be completed as soon as possible, while a low priority task could be saved until the work load reduces.
It's good practice to treat tasks as having a normal or high priority and saving the immediate tasks for real emergencies.
An assignee is the person required to work on the task at any given time.
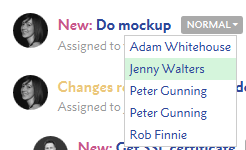
The assignee normally changes during a tasks life cycle.
For example a project manager may create a task for someone else to complete. They would set the assignee to the person who needs to work on it. Once that task has been completed, the task would then go back to the project manager for approval.
Some tasks involve several different people to complete. Assignees allow each person to do their part and then pass on to whoever else they need for the project to be completed.
To start a project head to .
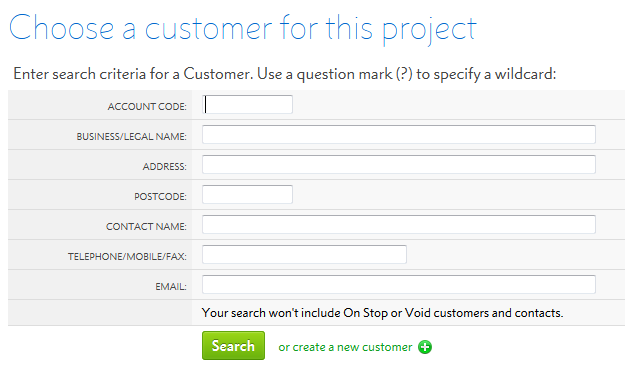
Choose the customer this project is for, or if it's an internal project you can make yourself the customer.
Then simply add the project title and a summary of the project.
.png)
You can use our toolbar and inbuilt styles to emphasise your summary or bulletpoint a list.

Project Members are the people you can assign tasks and ask questions of for this project.
Once a project is made, you will automatically be given project members based on the customer it's for.
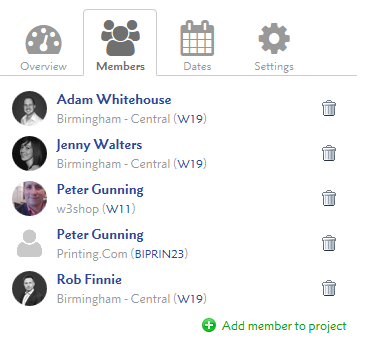
The project creator will always be added, and so will the project's customer with any sub-contacts they have. Finally all Flyerlink users in the workgroups of your customer will be added..
If you need to add any more, simply click the Add member to project link.

You can also remove project members who aren't involved in this case and don't need to see the tasks.
Your project settings are found on the left side of your project.
.png)
Each tab shows different aspects of the project.
The first tab provides an overview of the project.
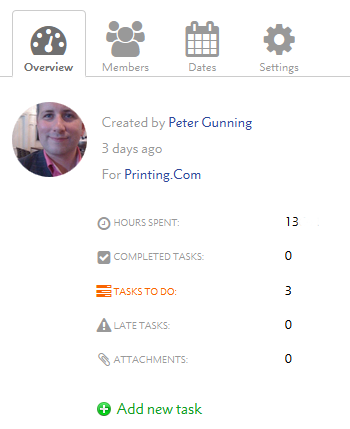
It shows you who created the task, and who it was created for.
You can also see how long ago the project was created.
The completed tasks shows how many tasks have been closed in the project.
Tasks to do shows what tasks still need to be done.
Late tasks are those that haven't been completed by their target date, which can be set in the Dates tab.
Finally the Attachments allows you to find any of the attachments used on your projects as images, PDF or spreadsheet files to transfer information.
The members tab shows who is involved in the project, and who tasks can be assigned to.

By default, when a project is created the following members are assigned:
If a task is for more customers, you can add extra.
You can also remove anyone who isn't directly involved in this project.
The dates tab shows when a project was created, last updated and how many hours have been logged on it so far.
.png)
You can also set a target date, if a project must be completed by a certain date.
With the settings tab you can see details of the Customer your project is for, and change the customer if needed.
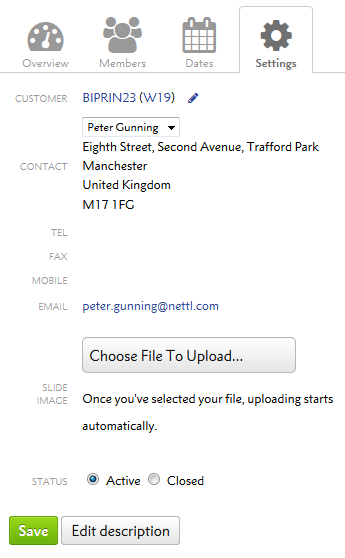
You can also upload a banner image, ideally 1165px wide, for your project, which will show on all your tasks.
Finally when the project is completed, you can change the status to Closed.
A project could potentially have lots of different tasks and sub tasks going on, so we've built lots of ways to help you find what you're looking for.
On a project summary page, by default you'll see a list of all the Active tasks that still need to be completed.

If you want to view the task, just click on the task number, assignee or task name.
You can use the task filters to narrow down the list of tasks.

The Active option will show you all tasks in project, that don't have a Status of or . The Completed option will show you tasks that have been , incase you need to see them for future reference.
You can also filter by Priority, Status or Assignee to find tasks that match the option you're after. This could be used to find High priority tasks, or tasks assigneed to a particular workmate. You will only see statuses, priorities or assignees that have at least 1 matching task.
Finally you can also change the ordering your tasks show in.

You can search for tasks or projects via .
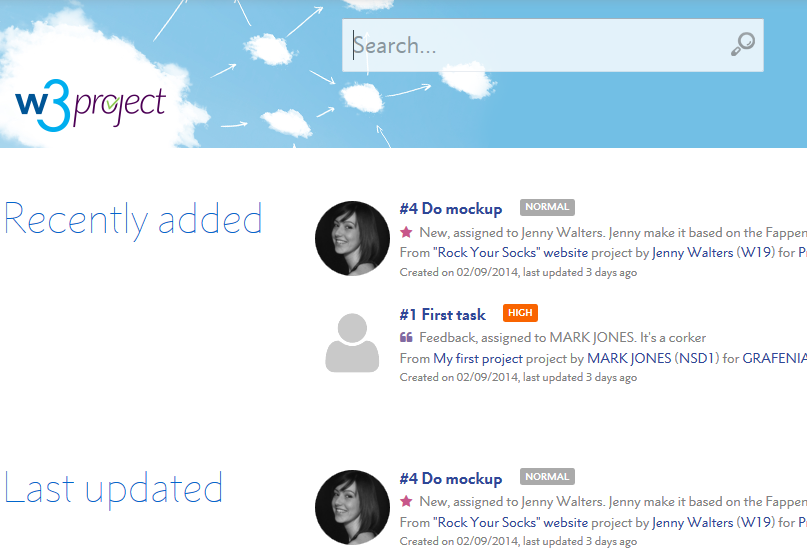
Before you search, you'll be shown a list of the tasks you're most likely to want to view. It will show you Recently Added tasks, Last Updated tasks, and Assigneed To Me tasks.
You can search for the task name or #id , and it will find any matches

Each task can have sub-tasks, which are issues related to or dependent on the parent task.
You can see all sub-tasks underneath the task updates.
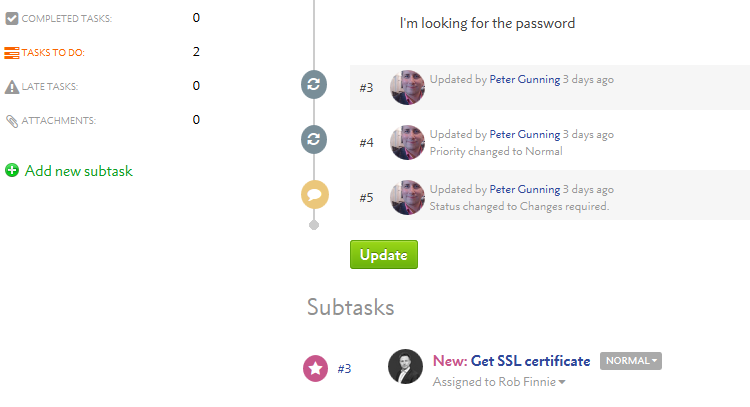
The task overview will show you how many of this and it's sub-tasks have been completed, are late or are still to do.
You can follow the link on the sub-task to view and update it.
Sub-tasts are a great way of re-finding related activities. If you can find one task, with sub-tasks you'll be able to find several more.
When you're on a sub-task you're able to both change the parent task and use the breadcrumb links to move back.

The grey links across the top of a task help you to move back to the project, or a parent task.

If you need to change the parent task, or move it to be a sub-task of a new parent task, you can do that easily by choosing a different task on the dropdown menu.

Tasks are small activities that come together to complete a larger project.
You can create a task from within your Project summary by pressing one of the Add new task links.
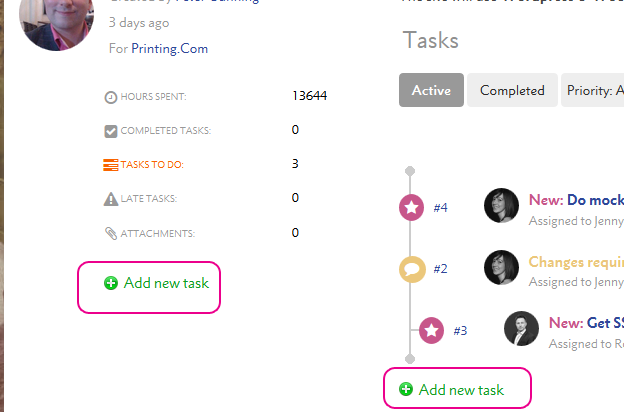
You can also create sub-tasks of an existing task from that page by pressing the Add new sub-task links.
When you create a new task, add the task name and a summary of what's involved.

You may like to number positive actions, to refer to later and break down a task into even smaller bite-size chunks.
By default your task's Status will be and the Prority will be Normal.
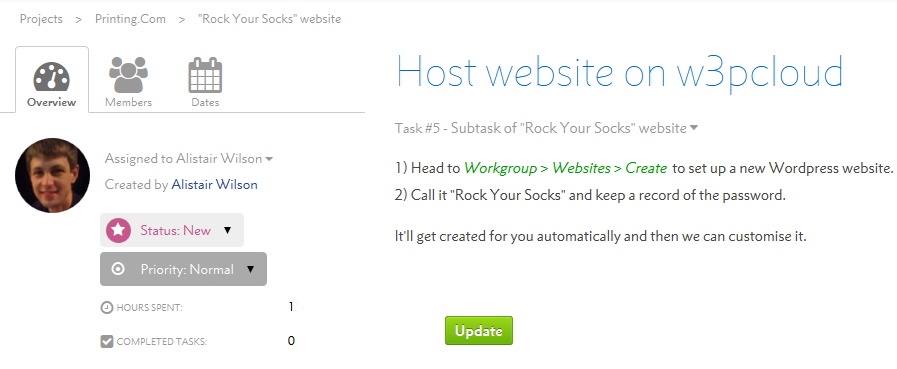
Once this is done, you can Update the task to add a comment or confirm the actions have been completed.
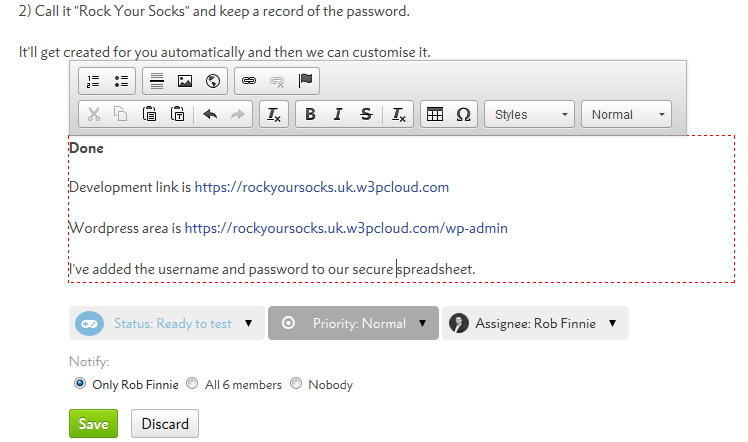
The task records all the updates and comments made by project members.
To edit a comment or description, simply double-click the comment and make your amendments

When you update a task, you can choose who gets an email and Flyerlink news feed notification with your comment and status changes.
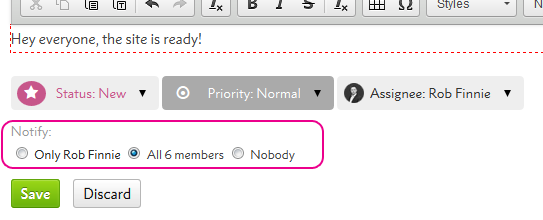
By default, only the assignee will be notified.
You can also choose to email all your task members for important updates, or nobody if it's a trivial change.

If you only need to change a tasks Status, Priority or Assignee and don't need to add a comment alongside the change, you can use our instant updates.
From a task:
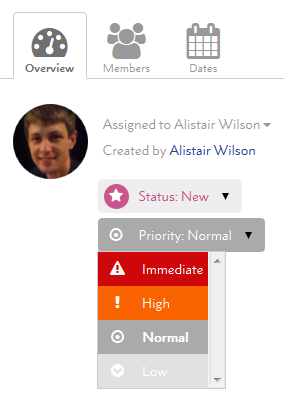
On the task overview tab, you can use the dropdowns to change the assignee, priority or status.
From a project:
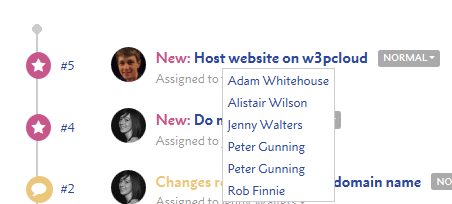
You can also update the status, priority, due date or assignee from the Project summary.
For complex projects like websites, payments are often staggered or staged rather than delivered in one bulk sum.
Staging payments reduces the risk for both the design agency and the client. The design agency receive some payment for their initial time outlay, and the client only pays the full amount when the work is completed.
Use Milestones to record website payments.
Avoid using a Jobs, Orders or Subscriptions.
To create a Milestone, simply:
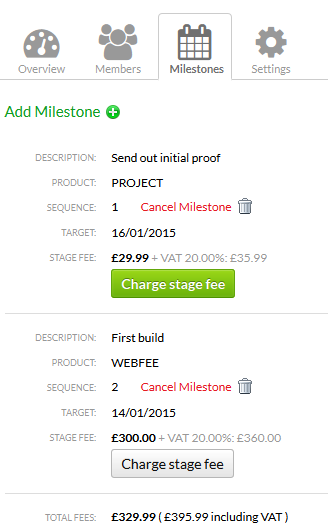
Once you've done all the work required for a milestone, press the Charge Stage Fee button.
This will mark the milestone as complete, and create a charge job.
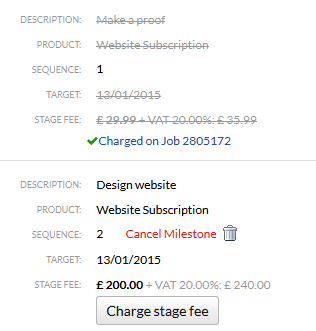
By default milestones create a charge job at status 008
This way you can review the charge job before sending to 081 and making an invoice.
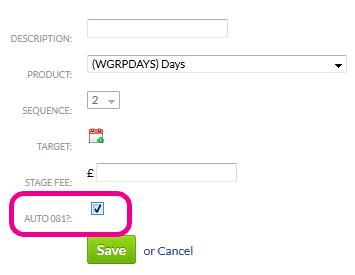
However you can use the Auto 081? option to create jobs that go to status 081 automatically when Charge stage fee is pressed.
You can also choose a stripe card for the project.
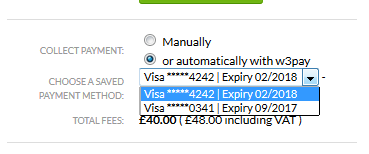
If a stripe card is chosen, we will charge the card for any jobs created that have "Auto 081?" ticked. This includes jobs that are automatically created by setting a target date and "Auto 081".
If the payment collection is successful, we'll make a cashbook and apply it to the job. We will also provide a newsfeed showing the job and cashbook that have been made.
If you set a target date, one of two things can happen:
1) Set a target date and leave "Auto 081?" disabled
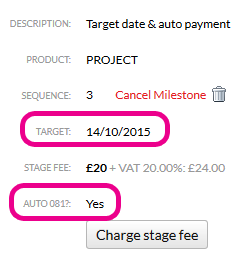
You will get a newsfeed when the target date has passed letting you know that the milestone should be completed or looked into.
The newsfeed notification will give you reminders about the milestone for 1 week.
2) Set a target date and tick "Auto 081?"

We will automatically create a charge job on your target date for the milestone, and will create a stripe payment if there's a stripe card against the project.
Milestones can be added to proposals to show clients the costs associated to a web project, however it is only project milestones that can be used to automatically create jobs.
Fast Paths provide proven steps, like a recipe, to help you quickly create beautiful websites. They are projects created by Nettl Geeks, usually based on websites created for real customers to help them with a specific need.
These paths then inform how websites are pitched to clients. If you know it's possible and relatively straightforward to build a site with a booking system, for example, you can be more confident in pitching a nettl :connect solution.
To find a fast path, head to .

You'll see a list of all the Fast Paths currently available, and can search for more. The list will explain what the Fast Path is about, click any of them to view the tasks and
Once you click on a fast path, you'll see a list of the essential tasks to complete.
.png)
Click any task to find out more information. You'll get a description of what is required, and steps to follow.

The best thing about a Fast Path, is you can choose one to start off a new project rather than re-writing the first steps for every website you create.
When you create a new project, you can either start from scratch or click "Choose Fast Path".
 |
This will show you a list of fast paths you can take all the tasks and related tasks from.
 |
Once you've created a project from a Fast Path, you can assign tasks to different members of your team. You can close tasks you don't need or edit the description to be more concise or to add extra information.
Fast Path tasks will likely be more detailed than the your average task assigned by a project member.
You can also Take a Fast Path when you're reading one from .
 |
Simply press Take Fast Path, choose the customer your next project is for and you'll have a whole new Fast Path project you can use and adjust for your next website project.